How to Deploy NestJS to AWS Lambda Using CDK and GitHub Actions
March 30, 2026 / 17 min read

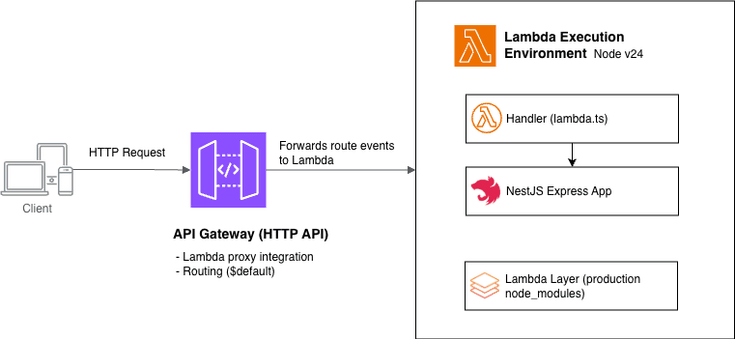
Deploying a NestJS application to AWS Lambda behind API Gateway sounds straightforward — until you start wiring things together.
Between adapting NestJS to a serverless runtime, configuring API Gateway, and setting up infrastructure with AWS CDK, there are several moving parts that can quickly become messy. While working on a personal side project, I ran into these challenges firsthand — particularly around adapting NestJS to Lambda’s execution model.
By the end of this guide, you’ll have:
- A NestJS app adapted for Lambda’s execution model using
@codegenie/serverless-express - Infrastructure defined as code: a Lambda function, HTTP API Gateway, provisioned with AWS CDK
- A GitHub Actions workflow that builds and deploys your stack automatically on every push to
main

The complete source code is available on GitHub.
Prerequisites
To follow along, you’ll need:
- An AWS account
- Basic familiarity with Node.js and NestJS
- Basic familiarity with AWS services and tools (AWS CLI, IAM, Lambda, API Gateway, CloudFormation)
- A GitHub account (for setting up Repository, and GitHub Actions)
You don't need to be AWS expertise to follow along, but having a rough idea of how Lambda, and API Gateway fit together will make things easier.
Set up a new NestJS project
Start by creating a new NestJS application using the Nest CLI:
npm i -g @nestjs/cli
nest new nestjs-serverless-aws-cdk
This scaffolds a standard NestJS project with all the necessary boilerplate.
For a deeper understanding of NestJS concepts and architecture, I highly recommend to checkout NestJS official documentation.
Now, start the application:
cd nestjs-serverless-aws-cdk
npm run start
You should see the application running at http://localhost:3000/ The default port is configured in src/main.ts:
import { NestFactory } from '@nestjs/core';
import { AppModule } from './app.module';

async function bootstrap() {
  const app = await NestFactory.create(AppModule);
  await app.listen(process.env.PORT ?? 3000);
}
bootstrap();
The scaffolded project already includes:
- A controller (
app.controller.ts) - A service (
app.service.ts) - A module (
app.module.ts)
Since the focus of this guide is deployment, we'll reuse the default endpoint instead of creating new ones.
Adapting NestJS for AWS Lambda
By default, a NestJS application runs on a long-lived HTTP server. It bootstraps once, initializes its dependencies, and continues handling incoming requests.
AWS Lambda, on the other hand, follows an event-driven model where code is executed per request in short-lived, stateless environments (with occasional cold starts).
Because of this difference, NestJS cannot run directly in Lambda without some adaptation.To bridge this gap, we use @codegenie/serverless-express, which allows a NestJS application to run inside AWS Lambda.
Under the hood, it:
- Converts the incoming Lambda event into an HTTP request
- Passes it to your NestJS application
- Transforms the response back into a Lambda-compatible format
In simple terms, it makes Lambda behave like an HTTP server so NestJS can run without major changes.
Now that we understand the need for additional configuration, let's install the required packages:
npm install @codegenie/serverless-express @types/aws-lambdaNote: @types/aws-lambda provides the TypeScript types used in the handler.
Next, create a new file called lambda.ts inside the src/ directory (alongside main.ts). This will act as the entry point for your Lambda function.
import { NestFactory } from '@nestjs/core';
import { ExpressAdapter } from '@nestjs/platform-express';
import serverlessExpress from '@codegenie/serverless-express';
import {
  APIGatewayProxyEvent,
  APIGatewayProxyResult,
  Context,
} from 'aws-lambda';
import express from 'express';
import { AppModule } from './app.module';

type AsyncHandler = (
  event: APIGatewayProxyEvent,
  context: Context,
) => Promise<APIGatewayProxyResult>;

let serverlessExpressInstance: AsyncHandler | undefined;

async function setup(
  event: APIGatewayProxyEvent,
  context: Context,
): Promise<APIGatewayProxyResult> {
  const expressApp = express();
  const nestApp = await NestFactory.create(
    AppModule,
    new ExpressAdapter(expressApp),
  );

  nestApp.enableCors();
  await nestApp.init();

  serverlessExpressInstance = serverlessExpress({
    app: expressApp,
  }) as unknown as AsyncHandler;

  return serverlessExpressInstance(event, context);
}

export function handler(
  event: APIGatewayProxyEvent,
  context: Context,
): Promise<APIGatewayProxyResult> {
  if (serverlessExpressInstance) {
    return serverlessExpressInstance(event, context);
  }

  return setup(event, context);
}
A few key things worth calling out in the code above:
serverlessExpressInstancevariable is declared outside the handler and only populated on the first invocation. On subsequent invocations within the same Lambda container, theif (serverlessExpressInstance)check skips the full NestJS bootstrap and reuses the existing instance. This is the standard pattern for reducing cold start overhead in Lambda.setupfunction is where NestJS bootstraps. It creates an Express app, wraps it with the NestJSExpressAdapter, and passes it toserverlessExpress. The resulting instance is a function that accepts Lambda events and returns Lambda-compatible responses.
This handler follows the standard async/await pattern and works with modern AWS Lambda Node.js runtimes (including Node.js 20 and 24).
The AWS Lambda Node.js 24 runtime dropped support for the callback-style handler (callback(null, response)) — using it will cause the function to hang until timeout. See the AWS Lambda Node.js runtime docs for details.
Setting up infrastructure using AWS CDK
Now that we have the Lambda handler ready to serve our NestJS application, let's set up the infrastructure using AWS CDK. AWS Cloud Development Kit (CDK) is an Infrastructure as Code (IaC) framework that allows you to define AWS resources using programming languages such as TypeScript, Python, Java, and more. Think of it like this: instead of writing raw CloudFormation templates, you write code that is synthesized into CloudFormation, which is then used to deploy resources to AWS.
The high-level CDK flow looks something like this:
👨💻 Write CDK Code
↓
🧪 cdk synth
↓
📄 CloudFormation Template
↓
🚀 cdk deploy
↓
☁️ AWS ResourcesIn practice, CDK makes infrastructure easier to reason about and maintain compared to raw templates.
CDK mental model (quick overview)
Before we define our infrastructure, it helps to understand a few core CDK concepts:
- App → The root container for your CDK application
- Stack → A unit of deployment (maps to a CloudFormation stack)
- Construct → Building blocks used to define AWS resources
In this guide, we'll define a single stack that provisions our Lambda function, API Gateway, and related resources.
Initializing CDK in the project
Now that you've understood the basics of AWS CDK, let's initialize it in our project. To keep the infrastructure code separate from the NestJS source code, you'll initialize the CDK project into a separate subdirectory, infra/.
Run the following command from the project root:
mkdir infra && cd infra
npx cdk init app --language typescript
This generates the basic CDK project structure:
.
├── bin/
├── lib/
├── cdk.json
├── package.json
└── tsconfig.json
Where:
bin/contains the entry point of your CDK applib/contains the stack definition for your infrastructurecdk.jsoncontains configuration for the CDK CLI
Configuring AWS credentials (step by step)
Before running any AWS CDK commands, you need to configure AWS credentials on your local machine.
This allows AWS to authenticate your requests and perform actions on your behalf — such as deploying CloudFormation stacks and uploading assets.
For example, when you run:
npx cdk bootstrapYour IAM identity needs permissions to create foundational resources like:
- CloudFormation stacks
- S3 buckets (for storing assets)
- IAM roles and policies
In production environments, it's best to follow the principle of least privilege, granting only the permissions required for a specific task.
However, to keep this guide simple and focused, we'll use an IAM user with the AdministratorAccess policy attached.
Follow these steps to configure AWS credentials:
1. Install AWS CLI
Make sure AWS CLI is installed on your machine. Follow the official installation guide.
2. Create an IAM user
Create IAM user with AdministratorAccess policy and generate an access key for it.
- Log in to your AWS console
- Navigate to IAM → Users → Create User
- Create a user (e.g.,
cdk-bootstrap-admin)- Attach the AdministratorAccess policy
- Generate an access key
Make sure to download the secret key for use later — you won't be able to view it again.
3. Run AWS Configure
Run aws configure to set up credentials for the AWS CLI so it can authenticate your requests:
aws configureYou'll be prompted to enter:
AWS Access Key ID:
AWS Secret Access Key:
Default region name: us-east-1
Default output format: json
Paste the access keys you generated in the previous step.
4. Verify credentials configuration
To confirm AWS credentials are configured correctly, run the following AWS CLI command, which will show the details of your AWS account and IAM user:
aws sts get-caller-identity{
"UserId": "UserId",
"Account": "AccountNumber",
"Arn": "arn:aws:iam::<AccountNumber>:user/cdk-bootstrap-admin"
}Bootstrapping the CDK project
Now that your AWS credentials are configured locally, you're ready to bootstrap your AWS environment for CDK.
Bootstrapping prepares your AWS account so that AWS CDK can deploy resources on your behalf.
Run the following command in your infra/ directory:
npx cdk bootstrapThis command creates a foundational one-time CloudFormation stack (called CDKToolkit) in your AWS account, which sets up required resources such as IAM roles and an S3 bucket to upload CloudFormation templates. These resources are needed for future CDK deployments.

You only need to run cdk bootstrap once per account and region.
Writing the CDK stack
Now that you've bootstrapped your environment, you're ready to define your infrastructure using AWS CDK. In this section, you'll create a stack that provisions a Lambda function for your application.
I'm also using a Lambda layer to bundle production dependencies. Separating node_modules from the application code helps reduce the size of the deployment package and allows the same layer to be reused across multiple Lambda functions.
Navigate to the infra/lib directory, where you'll find a file named infra-stack.ts. This file was generated during CDK project initialization. You can rename the stack if needed, but for this guide, we'll keep it as is.
Add the following stack definition code to infra/lib/infra-stack.ts:
import * as cdk from 'aws-cdk-lib/core';
import { Construct } from 'constructs';
import * as lambda from 'aws-cdk-lib/aws-lambda';import * as apigwv2 from 'aws-cdk-lib/aws-apigatewayv2';import * as integrations from 'aws-cdk-lib/aws-apigatewayv2-integrations';import * as path from 'path';
export class InfraStack extends cdk.Stack {
  constructor(scope: Construct, id: string, props?: cdk.StackProps) {
    super(scope, id, props);

    const nodeModulesLayer = new lambda.LayerVersion(this, 'NodeModulesLayer', {      code: lambda.Code.fromAsset(path.join(__dirname, '../../layer')),      compatibleRuntimes: [lambda.Runtime.NODEJS_24_X],      description: 'Production node_modules for NestJS Lambda',    });    const nestApiLambda = new lambda.Function(this, 'NestApiLambdaFunction', {      runtime: lambda.Runtime.NODEJS_24_X,      handler: 'src/lambda.handler',      code: lambda.Code.fromAsset(path.join(__dirname, '../../dist'), {        exclude: ['infra', 'tsconfig*'],      }),      memorySize: 512,      layers: [nodeModulesLayer],    });    const httpApi = new apigwv2.HttpApi(this, 'HttpApi', {      defaultIntegration: new integrations.HttpLambdaIntegration(        'LambdaIntegration',        nestApiLambda,      ),    });    new cdk.CfnOutput(this, 'HttpApiUrl', {      value: httpApi.url!,    });  }
}
In this setup, you're using a few core CDK constructs to define your infrastructure:
lambda.Functionlambda.LayerVersionapigwv2.HttpApi
In CDK, constructs are the basic building blocks used to model infrastructure. If you haven't come across constructs before, the official docs are worth a quick read: AWS CDK Constructs.
Now let's go through the different configuration parts in the code above.
Lambda layer configuration
const nodeModulesLayer = new lambda.LayerVersion(this, 'NodeModulesLayer', {
  code: lambda.Code.fromAsset(path.join(__dirname, '../../layer')),
  compatibleRuntimes: [lambda.Runtime.NODEJS_24_X],
  description: 'Production node_modules for NestJS Lambda',
});
This code defines a Lambda layer using the LayerVersion construct, where the code is loaded from a layer/ directory, which doesn't exist yet.
To create it, add the following script to your root package.json:
"build:lambda-layer": "mkdir -p layer/nodejs && cp package.json package-lock.json layer/nodejs/ && npm ci --prefix layer/nodejs --omit=dev && rm layer/nodejs/package.json layer/nodejs/package-lock.json"Since we don't need dev dependencies for our Lambda runtime, this script installs only production dependencies into layer/nodejs/. In short, it copies the existing package.json and lock file into layer/nodejs/ temporarily and installs production dependencies (npm ci --omit=dev) that our application needs.
Now, run that script from the project root to create a /layer directory (we'll need this before deploying):
npm run build:lambda-layerAlso add /layer/nodejs/node_modules to your .gitignore. This directory should be generated during builds, not committed.
Lambda function configuration
const nestApiLambda = new lambda.Function(this, 'NestApiLambdaFunction', {
  runtime: lambda.Runtime.NODEJS_24_X,
  handler: 'src/lambda.handler',
  code: lambda.Code.fromAsset(path.join(__dirname, '../../dist'), {
    exclude: ['infra', 'tsconfig*'],
  }),
  memorySize: 512,
  layers: [nodeModulesLayer],
});
This code defines our Lambda function along with some configuration. Here's a breakdown of the key settings:
runtime: lambda.Runtime.NODEJS_24_X: sets Node.js v24 as the runtime used by the Lambda functionhandler: 'src/lambda.handler'— the entry point Lambda invokes. We created this handler previously insrc/lambda.ts. Since the application is deployed from thedistdirectory which contains asrcfolder, the handler is defined assrc/lambda.handler.code: lambda.Code.fromAsset(…)— packages the compiled application (dist/) and uploads it as the deployment bundleexclude: […]— skips unnecessary files from the bundle. I would strongly recommend being intentional here — smaller bundles lead to faster deployments. For example, I've excluded theinfradirectory andtsconfig*related files present in ourdistdirectory. The only files needed for the NestJS runtime are indist/src.memorySize: 512— allocates 512 MB of memory to our Lambda runtime. NestJS has a heavier bootstrap compared to minimal handlers, so this tends to give better performance out of the box. WithoutmemorySize, it defaults to 128 MB.layers— attaches the layer defined above. This layer is merged into the function's filesystem at runtime.
HTTP API Gateway configuration
const httpApi = new apigwv2.HttpApi(this, 'HttpApi', {
  defaultIntegration: new integrations.HttpLambdaIntegration(
    'LambdaIntegration',
    nestApiLambda
  ),
});
Here you define an HTTP API using API Gateway v2. This guide uses HTTP API (v2), which is cheaper than REST API (v1), has lower latency, and is sufficient for NestJS since routing lives inside the application. See the official comparison if you need the advanced features REST API offers.
This uses HttpLambdaIntegration, which enables Lambda proxy integration. In simple terms, any incoming HTTP requests to API Gateway are forwarded to your Lambda as an event, and the response from Lambda is forwarded back to the client unchanged.
By setting this as the default integration, CDK creates a $default route — a catch-all that matches any HTTP method and any path. This is an important consideration for our NestJS application because we want the routing to happen inside the application itself, not at the API Gateway level.
CloudFormation outputs
new cdk.CfnOutput(this, 'HttpApiUrl', {
  value: httpApi.url!,
});
This prints the generated endpoint URL to the terminal after running cdk deploy. Something like this:
Outputs:
InfraStack.HttpApiUrl = https://abc123.execute-api.us-east-1.amazonaws.com/
Stack ARN:
arn:aws:cloudformation:us-east-1:<account-number>:stack/InfraStack/a0fb4130-2a7f-11f1-ab1d-12c493467933
Deploying the infrastructure
At this point, your infrastructure is defined. Now it's time to deploy it.
Deploying locally
Before running the cdk deploy command, let's first validate the CloudFormation stack by running cdk synth from the infra/ directory:
cd infra && npx cdk synthThis compiles your CDK code and generates the CloudFormation template in the infra/cdk.out/ directory. It's a quick way to catch configuration issues before running a full deployment.

Once synthesis succeeds, make sure your tsconfig.build.json excludes the infra/ directory and explicitly sets rootDir:
{
  "extends": "./tsconfig.json",
  "compilerOptions": {
    "rootDir": "./"
  },
  "exclude": ["node_modules", "test", "dist", "infra", "**/*spec.ts"]
}
Two things are happening here:
- Excluding
infra/— without this,nest buildwill try to compile your CDK code as part of the application. Since CDK dependencies likeaws-cdk-libare installed insideinfra/node_modules(not at the project root), the build will fail with module resolution errors. - Setting
rootDir— controls the output folder structure. Without it set explicitly, TypeScript figures it out from whichever files are included. Onceinfra/is excluded, TypeScript only seessrc/and uses that as the root — solambda.tscompiles todist/lambda.jsinstead ofdist/src/lambda.js, which no longer matches the handler path you defined in the stack.
Now build your application (dist/) and Lambda layer (layer/) from the project root:
npm run build
npm run build:lambda-layer
This ensures your compiled application and production dependencies are ready for deployment.
Now run the deploy command from the infra/ directory:
npx cdk deployThis starts the CDK deployment process. You'll see a summary of IAM and resource changes before it proceeds.

Confirm the deployment when prompted. After a successful deploy, you'll see the API URL in the terminal output.

Hit this URL and you should see the "Hello World!" response from your app.controller.ts endpoint — your NestJS app is live on AWS Lambda!

Deploying with GitHub Actions
So far, you've been deploying locally using cdk deploy. That works well for development, but in a production-grade setup, you'll want deployments to run through CI.
A common approach is to trigger deployments automatically when changes are pushed to the main branch. In this section, we'll keep things simple and use GitHub Actions to automate deployments on every push to main. I won't walk through the workflow line by line — the goal here is to get a working setup in place.
If you're new to GitHub Actions, the official docs are a good place to start.
Add the following file .github/workflows/deploy.yml:
name: Deploy

on:
  push:
    branches:
      - main
jobs:
  deploy:
    runs-on: ubuntu-latest

    steps:
      - name: Checkout
        uses: actions/checkout@v4.2.2

      - name: Set up Node.js
        uses: actions/setup-node@v4.4.0
        with:
          node-version: 24
          cache: 'npm'

      - name: Install dependencies
        run: npm ci

      - name: Build application
        run: npm run build

      - name: Build Lambda layer
        run: npm run build:lambda-layer

      - name: Configure AWS credentials
        uses: aws-actions/configure-aws-credentials@v4.1.0
        with:
          aws-access-key-id: ${{ secrets.AWS_ACCESS_KEY_ID }}
          aws-secret-access-key: ${{ secrets.AWS_SECRET_ACCESS_KEY }}
          aws-region: ${{ vars.AWS_REGION }}

      - name: Install CDK dependencies
        run: npm ci
        working-directory: infra

      - name: Deploy CDK Stack
        run: npx cdk deploy --require-approval never
        working-directory: infra
At a high level, this workflow:
- Installs dependencies
- Builds the application (
dist/) and Lambda layer (/layer) - Configures AWS credentials for CI
- Deploys the CDK stack
AWS credentials for CI
If you see the workflow code, you see it uses GitHub secrets and variables to authenticate with AWS:
AWS_ACCESS_KEY_ID// stored as a secretAWS_SECRET_ACCESS_KEY// stored as a secretAWS_REGION// stored as a variable
Make sure you add these in your repository settings. You can follow the official guides:
Note: GitHub masks secret values in logs, so outputs like your API URL (which includes the region) will also be masked and won't be directly clickable. Using vars for AWS_REGION keeps the output readable and ensures the endpoint URL is visible and usable, while sensitive values remain stored in secrets.
Once everything is in place, push your changes (including the workflow file) to the main branch. This will trigger the deployment automatically.
You can monitor the workflow from the Actions tab in your repository.
After the workflow completes, open the workflow run and check the Deploy CDK Stack step — the HttpApiUrl will be printed there without the region being masked.

Conclusion
That's the full setup. If you've made it this far, you have a production-ready baseline for running NestJS on AWS Lambda!
You adapted NestJS to fit Lambda's execution model, defined your infrastructure as code using CDK, exposed it through API Gateway, and automated deployments with GitHub Actions. None of these pieces are complex on their own — but together they give you a setup that's consistent, repeatable, and easy to extend.
A few things this setup gets right out of the box:
- Infrastructure is version-controlled alongside your application code
- Deployments are automated and consistent, and can be extended to support multiple environments
- NestJS runs in Lambda without changes to your routing or application logic — the gateway proxies everything through and NestJS handles it internally
From here, you can layer in things like custom domains, environment-specific stacks, API Gateway authentication, or move to container-based Lambda deployments if your workloads grow.
Thanks for following along — enjoy the serverless!


Hey ��— I'm Ajeet, a Software Engineer with commercial experience building and maintaining production systems. I write about modern software development, side projects, and things I find interesting along the way. If something here saved you time, a coffee is always welcome 😊
Buy me a CoffeeGet in touch
Follow along for updates, what I’m building, and new posts, or just say hello — I’m always open to a good conversation about software.
Want new articles straight to your inbox?
Subscribe to my newsletter →
Comments